
To transfer Google Authenticator to a new phone, the fastest method is signing into your Google Account inside the app. Your verification codes sync automatically. If you do not use a Google Account, open the app on your old phone, go to Transfer Accounts, then Export Accounts, get a QR code, and scan it on your new device. Both methods are secure and take under ten minutes.
Switching phones can be stressful when your security codes are involved. Knowing how to use Google Authenticator transfer is important for anyone who wants to move their two-factor authentication accounts without losing access.
The good news is that Google Authenticator has a built-in transfer feature. It lets you export accounts from your old phone and import them to a new one safely. This guide walks through each method clearly so you can finish the transfer without errors and keep your accounts protected.
What Is Google Authenticator Transfer?
Google Authenticator stores time-based one-time passwords, also called TOTP codes, on your phone. These codes protect your 2-Step Verification on accounts like Gmail, banking apps, and social media platforms.
When you switch phones, you need to move those codes to your new device. If you do not, you could lose access to every account protected by two-factor authentication (2FA).
There are two main ways to transfer your codes. The first is Google Account sync, which is automatic and cloud-based. The second is manual QR export, which works even without a Google Account. A third option using backup codes handles emergency situations like a lost or broken phone.
Which Transfer Method Should You Use?
If your Google Authenticator app is linked to a Google Account, use the sync method. It is automatic and takes about one minute. If you are not signed into a Google Account, use the manual QR export method. If your old phone is lost or already wiped, use your backup codes.

Here is a quick decision guide:
| Your Situation | Best Method |
|---|---|
| Signed into Google Account in the app | Method 1: Google Account Sync |
| Not signed into a Google Account | Method 2: Manual QR Export |
| Old phone is lost or broken | Method 3: Backup Codes |
Not sure which applies to you? Open Google Authenticator on your old phone. If you see a small cloud icon with a green checkmark at the top, your codes are already synced. Use Method 1.
What You Need Before You Start
Before you begin the transfer, take a few minutes to prepare. This helps avoid errors and reduces the risk of losing access to your accounts.
Make sure you have the following ready:
- Your old phone with Google Authenticator installed and working
- Your new phone with Google Authenticator downloaded from the App Store or Google Play
- Both phones charged and available at the same time (required for QR export)
- Camera permissions enabled on your new phone
- Backup codes or recovery options saved for your most important accounts
It is also a good idea to double-check that all your accounts are visible and generating codes correctly on the old device before you start. Taking five minutes to prepare avoids most common transfer mistakes.
Method 1: Transfer Google Authenticator Using Google Account Sync
This is the easiest and fastest transfer method. Google added cloud sync to the Authenticator app in April 2023, and it completely changed how device migration works. If you set this up before, your codes are already waiting in the cloud.
Requirements: Google Authenticator version 6.0 or higher on Android, or version 4.0 or higher on iOS. Check your app version in the Play Store or App Store and update if needed.
Follow these steps:
- On your new phone, open the Google Play Store or App Store
- Search for Google Authenticator and install it
- Open the app and tap Get Started
- Sign into the same Google Account you used on your old phone
- Your verification codes restore automatically
That is it. You do not need your old phone nearby. You do not need to scan any QR codes. Once you sign in, all your TOTP codes appear on your new device.
Important: Google encrypts your codes both in transit and at rest, so the sync process is secure.
Method 2: How to Manually Transfer Google Authenticator (QR Export)
This method works even if you do not have a Google Account. You will need both your old phone and your new phone at the same time.
Step 1: Open Google Authenticator on Your Old Phone
Start by opening Google Authenticator on your old device. Make sure you can see your full list of accounts and codes. If anything looks missing, fix it before continuing.
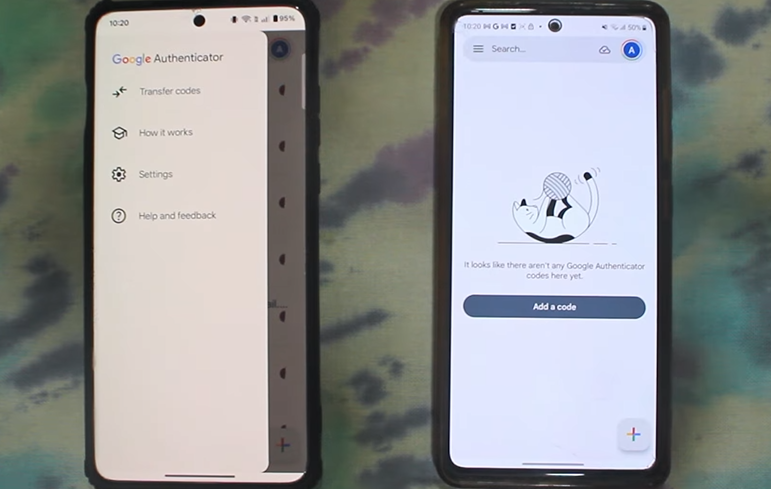
Step 2: Tap Transfer Accounts
Inside the app, tap the three-dot menu icon in the top right corner. Select Transfer Accounts from the menu. This feature lets you move your authentication data safely between devices.
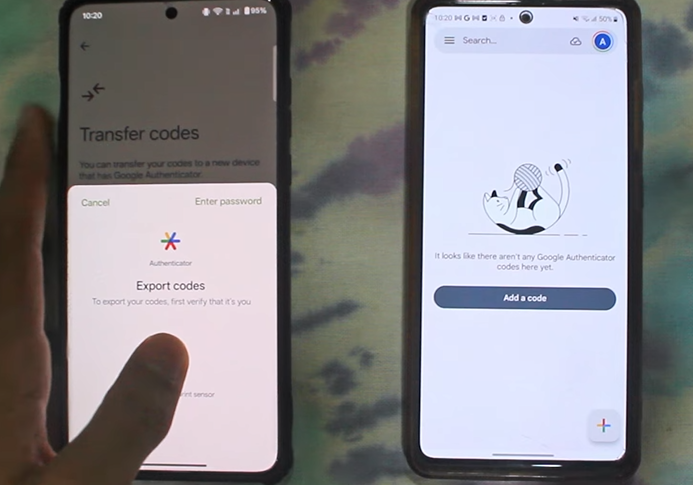
Step 3: Select Export Accounts
Tap Export Accounts to begin the transfer. You may be asked to verify your identity using your phone’s PIN, fingerprint, or face recognition.
After that, choose the accounts you want to transfer. You can select all accounts or just specific ones. The app will then generate a QR code containing your selected account data.
Note: If you are transferring more than one account, the app may generate more than one QR code. Scan each one on your new phone before closing the screen.
Step 4: Import Accounts on Your New Phone
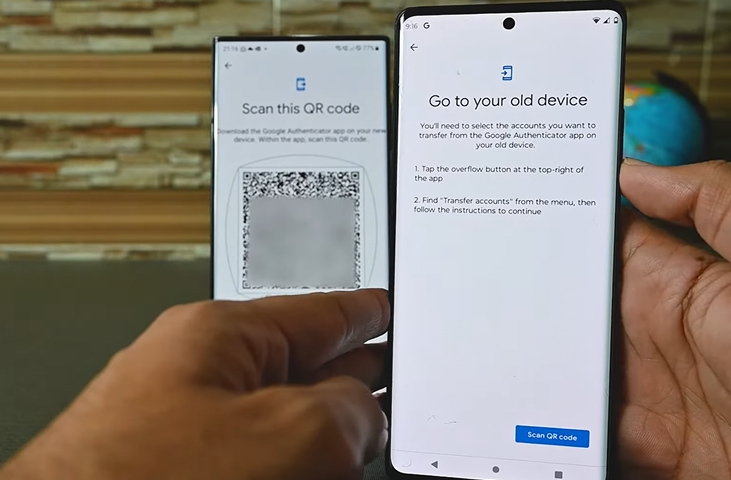
On your new phone, open Google Authenticator. Tap the three-dot menu and select Transfer Accounts, then Import Accounts. Tap Scan QR Code.
Point your new phone’s camera at the QR code on your old device. Hold it steady until the code is fully recognized. Once scanned, your accounts will appear automatically in the app.
Key fact: Transferring via QR code does NOT delete your codes from the old phone. Both phones will have the codes after the transfer. Once you confirm everything works on your new device, delete the accounts from the old phone manually.
Steps on iPhone (iOS)
The process is almost the same on iPhone. The only difference is the menu layout. Tap the three-dot icon at the top of the screen to find the Transfer Accounts option. All other steps follow the same order as Android.
Method 3: What If You Do Not Have Your Old Phone?
Losing your phone before completing a transfer is stressful, but you still have options.
Path A: Your Codes Were Synced to Your Google Account
This is the easiest recovery path. Install Google Authenticator on your new phone, open it, and sign into your Google Account. Your codes restore automatically. No old phone needed.
You can also remove a lost or stolen device from your Google Account remotely. This removes synced codes from that device right away.
Path B: Your Codes Were Not Synced
You will need your backup codes. Google provides 10 one-time-use backup codes when you first set up 2-Step Verification.
To find or generate new backup codes:
- Go to myaccount.google.com
- Click Security
- Under “How you sign in to Google,” click 2-Step Verification
- Scroll down to Backup Codes
- Click Show Codes or Get New Codes
Use these codes to sign into each protected account. Then re-link a new authenticator device from the account’s security settings.
Worst case: If you have no sync and no backup codes and your old phone is gone, contact each service individually to disable 2FA and reconnect it. This usually involves verifying your identity through another method.
How to Transfer Google Authenticator from Android to iPhone
Many older guides say you cannot transfer between Android and iPhone. That is outdated. Both transfer methods work across platforms.
Using Google Account Sync (recommended for cross-platform):
- On your old Android phone, confirm you are signed into a Google Account in the Authenticator app
- On your new iPhone, install Google Authenticator from the App Store
- Open the app and sign into the same Google Account
- Codes sync automatically
Using Manual QR Export (also works cross-platform):
- On your Android, go to Transfer Accounts, then Export Accounts
- Generate the QR code on your old phone
- On your new iPhone, go to Transfer Accounts, then Import Accounts
- Scan the QR code
Both methods also work from iPhone to Android. You do not need any third-party tools or extra apps.
What to Do After Transferring Google Authenticator
Once your codes are on the new device, take a few minutes to finish things up properly.
- Test your codes first. Generate a one-time password on your new phone and use it to log into one of your accounts. Confirm it works before doing anything else.
- Verify all accounts are present. Check that every account you transferred is showing up and generating codes correctly.
- Delete accounts from your old phone. After confirming the transfer, remove the accounts from your old device manually. Do not reset or wipe the old phone until you are 100 percent sure the transfer worked.
- Save new backup codes. Go to your Google Account security settings and create a fresh set of backup codes. Store them in a password manager or a secure offline location.
- Turn on Privacy Screen. Inside Google Authenticator, go to Settings and enable Privacy Screen. This hides your codes when the app is running in the background. It is a small step with meaningful security benefits.
- Update your recovery info. If you changed your phone number or email during the device switch, update your account recovery options too.
Common Google Authenticator Transfer Mistakes to Avoid
Even a simple transfer can go wrong. Here are the most common errors and how to avoid them:
- Wiping the old phone too soon. Always complete the transfer and test every code on the new device before resetting or selling the old phone.
- Thinking codes disappear from the old phone. They do not. Manual QR export copies the codes. It does not delete them. Remove them yourself after confirming the transfer.
- Skipping backup codes. Backup codes are your safety net. If you never saved them, generate a new set before starting the transfer.
- Using an outdated app version. Cloud sync requires Google Authenticator version 6.0 and above for Android and version 4.0 and above for iOS. Update the app before starting.
- Assuming QR export only works on the same platform. This is a myth. QR export works from Android to iPhone and iPhone to Android without any issues.
Keep Your Accounts Protected After the Transfer
Transferring your 2-Step Verification codes is a smart move any time you switch devices. The process takes under five minutes with Google Account sync, or about ten minutes with manual QR export. Either way, the key is to test your codes on the new device before wiping the old one and to keep your backup codes stored somewhere accessible.
Your 2FA setup protects the accounts you care about most. The email addresses linked to those accounts deserve the same level of care. If any of your accounts were created using a personal email address you use for everything, consider using a temporary disposable email for new sign-ups going forward. It adds a second layer of privacy without any extra effort on your part.